This post was contributed by guest blogger, Scott Messenger, Technical Support Scientist 2 at Promega Corporation.
It’s always an exciting time in the lab when you find a new assay to answer an important research question. Once you get your hands on the assay, it is always good to confirm it will work for your experimental setup. Repeating the control experiment shown in the technical manual is a great way to test the assay in your hands.
After running that first experiment of your assay, it looks pretty good. The trends of control and treatment are consistent. Time to get on with the experiments…but wait—the RLUs (Relative Light Units) are two orders of magnitude lower than the example data! I can’t show this data to my colleagues; it doesn’t match. What did I do wrong?
This is a concern that we in Technical Services hear frequently. The concern is real, and I had this same thought when doing some of my first experiments using luminescence. When a question like this comes in, a Technical Service Scientist will make sure the experiment was performed as we described, and in most cases it is. We then start talking about RLUs (Relative Light Units).
Many cell biology researchers can name their department’s or institutions’s “cell culture wizard”—the technician with 20+ years of experience whose cell cultures are always free from contamination, exhibit reliable doubling rates and show no phenotype or genotype weirdness. Cell culture takes skill and experience. Primary cell culture can be even more difficult still, and many research and pharmaceutical applications require primary cells.
Yet, among the many causes of failure to replicate study results, variability in cell culture stands out (1). Add to the normal challenges of cell culture a pandemic that shut down cell culture facilities and still limits when and how often researchers can monitor their cell culture lines, and the problem of cell culture variability is magnified further.
Treating Cells as Reagents
A good way to reduce variability in cell-based studies is to use the thaw-and-use frozen stock approach. This involves freezing a large batch of “stock” cells, then performing quality control tests to ensure they respond appropriately to treatment. Then whenever you need to perform an assay, just thaw another vial of cells from that batch and begin your assay—just like an assay reagent! This approach eliminates the need to grow your cells to a specific stage, which could take days and introduce more variability.
PCR amplification with a proofreading polymerase, like Pfu DNA polymerase, will leave you with a blunt end. However, another thermostable DNA polymerase, like Taq DNA Polymerase, adds a single nucleotide base to the 3’ end of the DNA fragment, usually an adenine, creating an “A” overhang. This “A” overhang can create difficulties when cloning the fragment is your end goal. You might consider creating a blunt end with Klenow or adding restriction sites to the ends of your PCR fragment by designing them in your primers. But why go through all those extra steps, when that “A” overhang allows efficient cloning of these fragments into T-Vectors such as the pGEM®-T Vectors? Fewer steps? Who can argue with that?
These assays are relatively easy to understand in principle. Use a primary and secondary reporter vector transiently transfected into your favorite mammalian cell line. The primary reporter is commonly used as a marker for a gene, promoter, or response element of interest. The secondary reporter drives a steady level of expression of a different marker. We can use that second marker to normalize the changes in expression of the primary under the assumption that the secondary marker is unaffected by what is being experimentally manipulated.
While there are many advantages to dual-reporter assays, they require careful planning to avoid common pitfalls. Here’s what you can do to avoid repeating some of the common mistakes we see with new users:
Blue/White colony screening helps you pick only the colonies that have your insert.
Q: Can PCR products generated
with GoTaq DNA Polymerase be used to for T- vector cloning?
A: Yes. GoTaq® DNA Polymerase is a robust formulation of unmodified Taq Polymerase. GoTaq® DNA Polymerase lacks 3’ →5’ exonuclease activity and displays terminal transferase activity that adds a 3′ deoxyadenosine (dA) to product ends. As a result, PCR products amplified using GoTaq® DNA Polymerases (including the GoTaq® Flexi and GoTaq® G2 polymerases) will contain A-overhangs which makes them suitable for T-vector cloning with the pGEM®-T (Cat.# A3600), pGEM®-T Easy (Cat.# A1360) and pTARGET™ (Cat.# A1410) Vectors.
Here in Technical Services we often talk with researchers at the beginning of their project about how to carefully design and get started with their experiments. It is exciting when you have selected the Luciferase Reporter Vector(s) that will best suit your needs; you are going to make luminescent cells! But, how do you pick the best way to get the vector into your cells to express the reporter? What transfection reagent/method will work best for your cell type and experiment? Do you want to do transient (short-term) transfections, or are you going to establish a stable cell line?
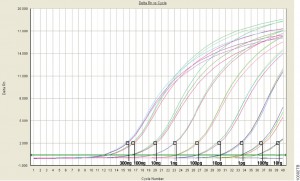
qPCR monitors amplification in real and allows you to measure starting material.
For those of us well versed in traditional, end-point PCR, wrapping our minds and methods around real-time or quantitative (qPCR) can be challenging. Here at Promega Connections, we are beginning a series of blogs designed to explain how qPCR works, things to consider when setting up and performing qPCR experiments, and what to look for in your results.
First, to get our bearings, let’s contrast traditional end-point PCR with qPCR.
End-Point PCR
qPCR
Visualizes by agarose gel the amplified product AFTER it is produced (the end-point)
Visualizes amplification as it happens (in real time) via a detection instrument
Does not precisely measure the starting DNA or RNA
Measures how many copies of DNA or RNA you started with (quantitative = qPCR)
Less expensive; no special instruments required
More expensive; requires special instrumentation
Basic molecular biology technique
Requires slightly more technical prowess
Quantitative PCR (qPCR) can be used to answer the same experimental questions as traditional end-point PCR: Detecting polymorphisms in DNA, amplifying low-abundance sequences for cloning or analysis, pathogen detection and others. However, the ability to observe amplification in real-time and detect the number of copies in the starting material can quantitate gene expression, measure DNA damage, and quantitate viral load in a sample and other applications.
Anytime that you are performing a reaction where something is copied over and over in an exponential fashion, contaminants are just as likely to be copied as the desired input. Quantitative PCR is subject to the same contamination concerns as end-point PCR, but those concerns are magnified because the technique is so sensitive. Avoiding contamination is paramount for generating qPCR results that you can trust.
Use aerosol-resistant pipette tips, and have designated pipettors and tips for pre- and post-amplification steps.
Wear gloves and change them frequently.
Have designated areas for pre- and post-amplification work.
Use reaction “master mixes” to minimize variability. A master mix is a ready-to-use mixture of your reaction components (excluding primers and sample) that you create for multiple reactions. Because you are pipetting larger volumes to make the reaction master mix, and all of your reactions are getting their components from the same master mix, you are reducing variability from reaction to reaction.
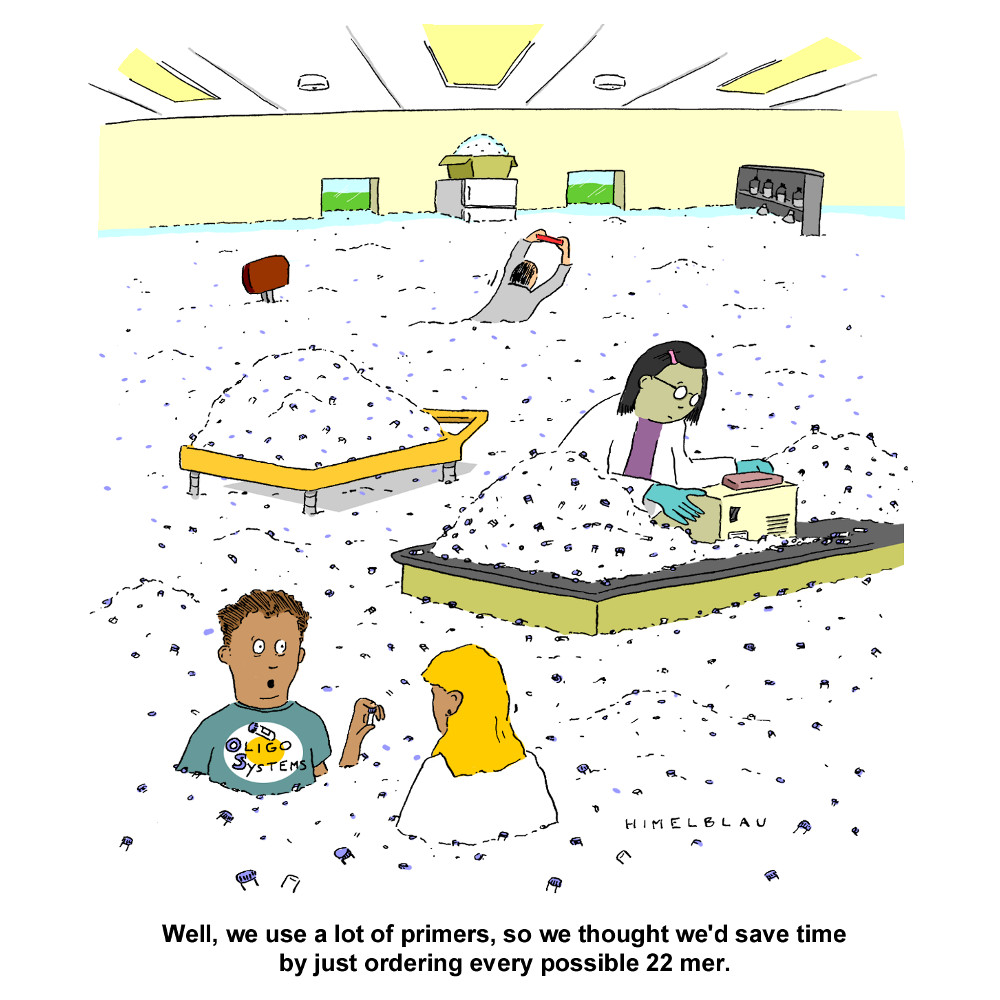
Dispense your primers into aliquots to minimize freeze-thaw cycles and the opportunity to introduce contaminants into a primer stock.
These are very basic tips that are common to both end-point and qPCR, but if you get these right, you are off to a good start no matter what your experimental goals are.
If you are looking for more information regarding qPCR, watch this supplementary video below.
The first time I performed PCR was in 1992. I was finishing my Bachelors in Genetics and had an independent study project in a population genetics laboratory. My task was to try using a new technique, RAPD PCR, to distinguish clonal populations of the sea anemone, Metridium senile. These creatures can reproduce both sexually and asexually, which can make population genetics studies challenging. My professor was looking for a relatively simple method to identify individuals who were genetically identical (i.e., potential clones).
PCR was still in its infancy. No one in my lab had ever tried it before, and the department had one thermal cycler, which was located in a building across the street. We had a paper describing RAPD PCR for population work, so we ordered primers and Taq DNA polymerase and set about grinding up bits of frozen sea anemone to isolate the DNA. [The grinding process had to be done using a mortar and pestle seated in a bath of liquid nitrogen because the tissue had to remain frozen. If it thawed it became a disgusting mass of goo that was useless—but that is a topic for a different blog.] Since I had never done any of the procedures before, my professor and I assembled the first set of reactions together. When we ran our results on a gel, we had all sorts of bands—just what he was hoping to see. Unfortunately, we realized that we had added 10X more Taq DNA polymerase than we should have used. I repeated the amplification with the correct amount of Taq polymerase, and I saw nothing. Continue reading “Optimizing PCR: One Scientist’s Not So Fond Memories”
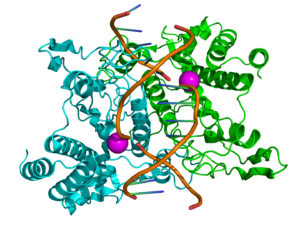
Ribbon diagram of EcoRI homodimer bound to doublestranded DNA
Restriction enzymes sometimes get a lot of flak. In the not-so-distant past, they were the workhorses of molecular biology. Restriction enzymes played a huge role in developing early DNA sequencing techniques. They chop DNA in a predictable manner, which makes cutting and pasting genes of interest manageable and relatively easy, enabling the development of genetic engineering and recombination technologies. These technologies are now moving beyond restriction enzymes toward more modern methods, with the most talked-about method being CRISPR /Cas9. As technology continues to advance at such a rapid pace, restriction analysis and other “ancient” technologies feel antiquated. But this is not necessarily the case.
Restriction enzymes recognize short DNA sequences and cleave double-stranded DNA at specific sites within or adjacent to these sequences. These enzymes are the workhorse in many molecular biology applications such as cloning, RFLP, methylation-specific restriction enzyme analysis of DNA, etc. Restriction enzymes with enhanced capabilities can help you streamline and shorten these workflows and improve success of restriction enzyme digestion.
A subset of Promega restriction enzymes offer capabilities that include rapid digestion of DNA in 15 minutes or less, ability to completely digest DNA directly in the GoTaq® Green Master Mix, and Blue/White Cloning Qualification which allows for rapid, reliable detection of transformants.
To learn more about restriction enzymes and applications, check out Restriction Enzyme Resource on the web. The resource provides everything from information on restriction enzyme biology to practical information on how to set up and design a restriction enzyme digestion. This resource also contains useful online tools, including the Restriction Enzyme Tool, to help you use enzymes more effectively. It helps you choose the best reaction buffer for double digests, find the commercially available enzyme that cuts your sequence of interest, find compatible ends, and search for specific information on cut site, overhang isoschizomers and neoschizomers by enzyme name.
For added convenience, you can download the mobile app available for iOS devices and use the Restriction Enzyme Tool to plan your next digest.
For additional information regarding Restriction Enzyme Digest, reference the supplementary video below.
XWe use cookies and similar technologies to make our website work, run analytics, improve our website, and show you personalized content and advertising. Some of these cookies are essential for our website to work. For others, we won’t set them unless you accept them. To learn more about our approach to Privacy we invite you to Read More
By clicking “Accept All”, you consent to the use of ALL the cookies. However you may visit Cookie Settings to provide a controlled consent.
We use cookies and similar technologies to make our website work, run analytics, improve our website, and show you personalized content and advertising. Some of these cookies are essential for our website to work. For others, we won’t set them unless you accept them. To find out more about cookies and how to manage cookies, read our Cookie Policy.
If you are located in the EEA, the United Kingdom, or Switzerland, you can change your settings at any time by clicking Manage Cookie Consent in the footer of our website.
Necessary cookies are absolutely essential for the website to function properly. These cookies ensure basic functionalities and security features of the website, anonymously.
Cookie
Duration
Description
cookielawinfo-checbox-analytics
11 months
This cookie is set by GDPR Cookie Consent plugin. The cookie is used to store the user consent for the cookies in the category "Analytics".
cookielawinfo-checbox-functional
11 months
The cookie is set by GDPR cookie consent to record the user consent for the cookies in the category "Functional".
cookielawinfo-checbox-others
11 months
This cookie is set by GDPR Cookie Consent plugin. The cookie is used to store the user consent for the cookies in the category "Other.
cookielawinfo-checkbox-advertisement
1 year
The cookie is set by GDPR cookie consent to record the user consent for the cookies in the category "Advertisement".
cookielawinfo-checkbox-necessary
11 months
This cookie is set by GDPR Cookie Consent plugin. The cookies is used to store the user consent for the cookies in the category "Necessary".
cookielawinfo-checkbox-performance
11 months
This cookie is set by GDPR Cookie Consent plugin. The cookie is used to store the user consent for the cookies in the category "Performance".
gdpr_status
6 months 2 days
This cookie is set by the provider Media.net. This cookie is used to check the status whether the user has accepted the cookie consent box. It also helps in not showing the cookie consent box upon re-entry to the website.
lang
This cookie is used to store the language preferences of a user to serve up content in that stored language the next time user visit the website.
viewed_cookie_policy
11 months
The cookie is set by the GDPR Cookie Consent plugin and is used to store whether or not user has consented to the use of cookies. It does not store any personal data.
Analytical cookies are used to understand how visitors interact with the website. These cookies help provide information on metrics the number of visitors, bounce rate, traffic source, etc.
Cookie
Duration
Description
SC_ANALYTICS_GLOBAL_COOKIE
10 years
This cookie is associated with Sitecore content and personalization. This cookie is used to identify the repeat visit from a single user. Sitecore will send a persistent session cookie to the web client.
vuid
2 years
This domain of this cookie is owned by Vimeo. This cookie is used by vimeo to collect tracking information. It sets a unique ID to embed videos to the website.
WMF-Last-Access
1 month 18 hours 24 minutes
This cookie is used to calculate unique devices accessing the website.
_ga
2 years
This cookie is installed by Google Analytics. The cookie is used to calculate visitor, session, campaign data and keep track of site usage for the site's analytics report. The cookies store information anonymously and assign a randomly generated number to identify unique visitors.
_gid
1 day
This cookie is installed by Google Analytics. The cookie is used to store information of how visitors use a website and helps in creating an analytics report of how the website is doing. The data collected including the number visitors, the source where they have come from, and the pages visted in an anonymous form.
Advertisement cookies are used to provide visitors with relevant ads and marketing campaigns. These cookies track visitors across websites and collect information to provide customized ads.
Cookie
Duration
Description
IDE
1 year 24 days
Used by Google DoubleClick and stores information about how the user uses the website and any other advertisement before visiting the website. This is used to present users with ads that are relevant to them according to the user profile.
test_cookie
15 minutes
This cookie is set by doubleclick.net. The purpose of the cookie is to determine if the user's browser supports cookies.
VISITOR_INFO1_LIVE
5 months 27 days
This cookie is set by Youtube. Used to track the information of the embedded YouTube videos on a website.
Performance cookies are used to understand and analyze the key performance indexes of the website which helps in delivering a better user experience for the visitors.
Cookie
Duration
Description
YSC
session
This cookies is set by Youtube and is used to track the views of embedded videos.
_gat_UA-62336821-1
1 minute
This is a pattern type cookie set by Google Analytics, where the pattern element on the name contains the unique identity number of the account or website it relates to. It appears to be a variation of the _gat cookie which is used to limit the amount of data recorded by Google on high traffic volume websites.